Be.eM
-
Posts
34 -
Joined
-
Last visited
-
Days Won
2
Be.eM's Achievements
Advanced Member (4/7)
4
Reputation
-
To answer this question myself: I've found a way which is not perfect, but does the job. As such, it's close to perfect ;-) What I'm doing now is: Set the whole scene geometry to be a "Reflection object only" Set the reflective ground to be completely black, and the reflection configuration to "Full" with 100% white als the reflection color Render the scene, which gives me only the (100%) reflection on the black floor, save the image Switch the scene geometry to render normally, hiding the reflective floor, save the image Now I've got two images to open in Photoshop, the reflective Floor including reflections, and the normal rendering without the floor. So in Photoshop I'm doing this: Open the reflection image, change image modus to "greyscale", save image separately (to be used later) Open the reflection image again, display its (so far useless) alpha channel, copy the complete greyscale image from the previously saved image to the alpha channel of the (still rgb) image of the reflection. Switch to the layer view again, make the background layer a regular layer (double click), use the alpha channel as a selection (CMD + ALT + 6), invert the selection, hit the delete key. Only the reflection remains, the rest of the background is gone. Open the normal device rendering, make the background layer a regular layer, use the alpha channel to delete the background, only the device remains. Drag the device layer over the reflection layer in the other image, so you've got the device including its reflections Add a third, underlying layer for the desired background color, and fill it accordingly. You can also do this after converting the image modus to CMYK (while maintaining the separate layers) Use the opacity of the reflection layer to control the strength of the reflection. Done, the image blends flawlessly into the colored (vector) CMYK background :-) That's it. Bernd
-
Hi all, is it possible to have an additional channel which allows the selection of only reflections on a plane? Similar to a shadow map which is rendered out? I'm currently struggling with that hyper modern approach of "every item on the title page must stand on a reflecting ground, everybody has this, so let's have this, too". My problem: I can initially render those reflections on a plane without problems, but later I'd need to replace the background with predefined color in the post, in order to match underlying CMYK vector graphics surfaces. This would be easy if I could simply cut out the reflected whatevers by means of a channel and put that CMYK color as a separate background layer in PS. Since reflections are rendered on geometry, would it be possible to render such a "reflection received map", too, somehow? Bernd
-
Thanks, Tomas, it was worth asking, though :-) Bernd
-
Hi Tomas, I know this is going to be a necro-bump, but… I've just opened and rendered a project in EIAS v9.1, using one of the old Konkeptoine C3 shaders (simple water). I got an error message from Camera, while using the 64 bit version. Switching the camera to 32 bit solved the issue for now, and the shader rendered. I suppose a 64-bit version of these old shaders is not (or no longer) available? Thanks, Bernd
-
Well, that's how it is advertised. However, it's primarily a good thing for the shareholders of the company in question. I haven't seen many new features in Adobe software that really make a difference or would have been a reason to *buy* an upgrade. Something is developed, some new features appear and get some hype, but still working functions get broken during updates, while other - long requested - features are not implemented. I don't mind an *option* to subscribe. But I really hate it if it's the only option.
-
Please keep the dongle (allows me to switch between as many machines as needed), and please don't start that evil subscription thing. At least not as the only option. Just think about it: if you had bought EIAS 9 via subscription, how much would you have paid for the same piece of software until today? I'm still working with several Adobe Creative Suites CS4/5/6 which have been fully paid for years, and which perfectly do everything I need. Why pay again and again for something that still does the same things (for me) as years ago? And even worse: for something that stops working if I stop paying, not even allowing me to work on old projects? No. Please don't. Bernd
-
Any idea how to export an EIAS model to Cinema4D?
Be.eM replied to Frankg's topic in EIAS General Forum
We could try the PolyTrans route. PolyTrans natively reads/writes EIAS FACT and C4D formats, so it's worth a test. I have no experience with such conversions (poly -> poly including textures), but I'd probably need the FACT model plus the corresponding texure folder. If you want to test this, just send a mail… doesn't have to travel far, it only goes to Bavaria, Germany ;) Bernd -
Christmas cards, annually rendered in EIAS since 1997… :)

-
Cool. You must be the first member from Vulcan here :D Bernd (also speaking a different language)
-
Ahhhhh… sometimes talking about problems solves the problems instantly. I shouldn't have activated the "premultiply alpha" option when opening the image in Photoshop. Sorry :blush: Bernd
-
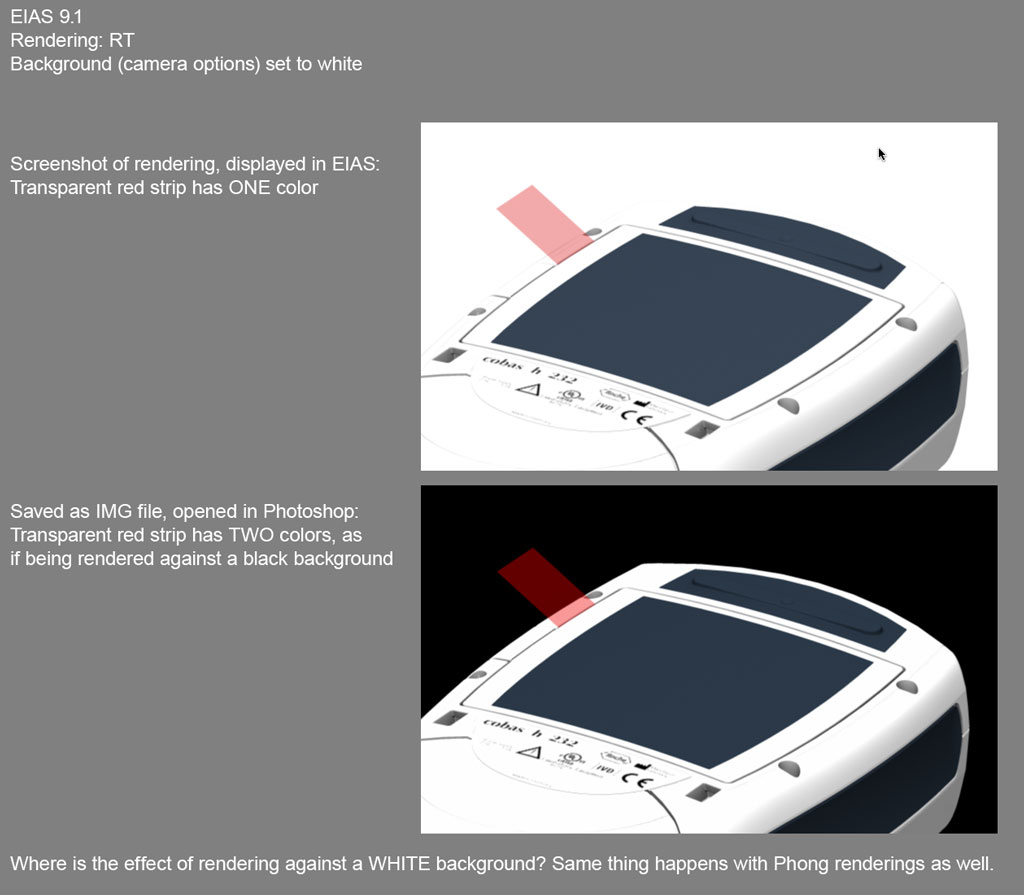
Tom, I'm not sure if this is a bug or just a misunderstanding, so I'll post it here. Main issue: Rendering against background colors set in the camera/background options doesn't make it this way to the saved image file. Expected result: color of the transparent red strip should be uniform across the whole length, as it's seen above white plastic and the white background. Actual result: non-uniform color output, the white background setting is ignored when saving the file. If I remember correctly, I already HAVE used this function (rendering transparent objects over white camera / world background) in earlier versions (7 and older), where it did work as expected… at least in my memory. What can I do/set to solve this? Thanks, Bernd

-
Modeler 5 launches with one dongle, but not the other ?
Be.eM replied to Paul P's topic in EIAS General Forum
Well, I can sell you my old EIAS ADB dongles. They create those warmer looking vintage renderings. Much better than that modern USB crap :D Seriously: doesn't modeler, like the EIAS application itself, save it's serial number and unlocking code on the disk after installing and initializing it? You can't use EIAS with two dongles (except you're installing two copies and only use it with the corresponding dongle), and I could imagine it's the same with the modeler. Bernd -
Because Maxon keeps (or kept) the specifications secret. I guess PolyTrans being the "Engineering" part of the "C4D Engineering bundle" helped Okino to learn about the format.
-
Scott, while all the formats Tom mentioned will probably work, there's another way which seems pretty unknown to most of the C4D (and EIAS) user community: As of 2012 or 2013 (not sure about the exact release date) Okino PolyTrans is able to read and write native C4D files (the only application apart from C4D itself), as well as FACT files (which it always did). Maybe worth a test, as it provides the use of native model files in both directions. I'm sure there are some parameters or conversion settings to be tested, but I was very excited to hear these news from Robert (Okino). Bernd
-
Steven, joining objects in FZ is a good way to simplify material handling. I often do this with e.g. hundreds of screws that don't need to be handled separately. Generally a master material with a diffuse map makes sense, if the diffuse map is a shader. Not so much with an actual bitmap image. However, you could still use a master material with a bitmap texture as "Copy-Paste source". Copy the master material parameter set, and and simply paste it into the material windows of the objects in question. There you can individually adjust size and positioning of the map, without having to enable/disable links etc. Bernd