Chenarch
-
Posts
74 -
Joined
-
Last visited
Content Type
Profiles
Forums
Events
Everything posted by Chenarch
-
Thank you, again, Richard. Sometimes I find Rodeo puzzling. I can "stumble" on to the right settings and get excellent results, then if I change one little thing, suddenly the moving objects change radically (vibrate in place or something odd) and I'm confused because don't understand the micro-happenings of each parameter... Anyway, learning curve!! Cheers, Richard
-
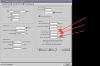
Hey all, Can someone explain to me in a sentence what the values mean that I have highlighted in this snapshot of the RODEO Advanced Tab... ? Thanks! Richard
-
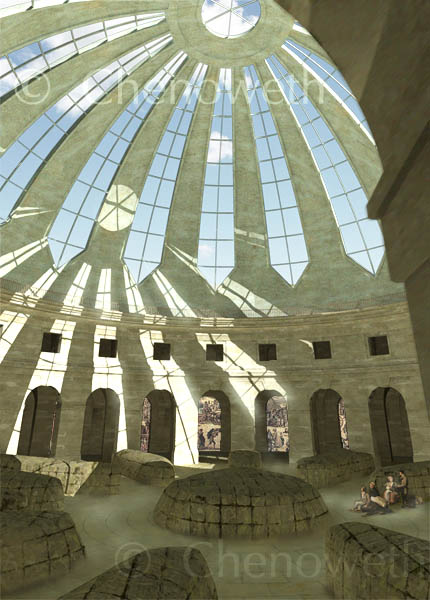
In my previous thread, Tomas was helping me get a deeper understanding of photons. In that smaple rendering I posted, I was trying to texture map gigantic piles of sacks of grain (it's an 18th century grain market). Any ideas for texture mapping gigantic piles of sacks of grain? I made radial rough shapes then T-subbed them into rough piles, then mapped w grainy textures, grunge and a tiling pattern with an alpha channel... Maybe I need photo graphs of giant piles of corn and whatnot... Any ideas? Thanks!!! Richard
-
More great tips, here, Tom... it gives me a better understanding of how to manipulate photons. Thanks!:) Richard
-
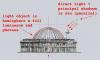
Hi Tom! Thank you again for taking a look at that. I've done about 100 test renderings now and getting a much better hang of it. I thought the "Lookup Radius" related to light source distance from subject. I think I'm understanding it better now. I do have a question. I set up my scene (image posted) using a sun casting primary shadows through a glass roof of a grain market. Then I set up a hemi-spheric light object which will cast photons. To be able to "see" the sun light rays, the light object (which covers the glass roof basically) has to be transparent. Then when I turn on the light object and make it shoot photons, I have to make the light object opaque again so it can be fully luminent. Then I've tried going back to "Sun" only, and the sun rays are no longer there until I turn off light object and start all over. Question: Does the process of baking the photon stuff bake in the GI and the direct sun as well? Or, why is the Sun still there now that the light object is no longer transparent... ? Am I making sense? Anyway the setup for this image is: 400K photons, Direct 20, Bounce 30, Control Distance 1070, Dens Diag 258K in 17. Thank You!!

-
Ola Tomas, I have emailed to you the FTP location etc... thank you very much for helping!! Best regards, Richard
-
Hi Tomas, Thank you for taking a look... I tried to send but my email always got rejected... I have posted on ftp too.. Richard
-
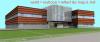
Hey Tomas and others, Back on Photons again! And now trying to use photons in a MUCH Larger interior (similar to scale of Blackpool rendering used in EIAS3D banner. Couple of questions. 1) I blocked off window openings (where Area Lights are which are generating photons). Will photons escape through here? Do I need to block off these openings with transparent objects? 2) I'm getting a lot of splotchiness on walls, whereas last June, when I was getting smoother walls. I have tried w GI on and GI off. Also now getting render lines near ceiling lights I've not gotten before... 3) Renders are with: photons>Always vis+database+Always Direct: 80 GI: No skylight, only Rev Illum one bounce Many thanks, Richard

-
It would be cool if when the render finishes stitching, it would make an audio signal, so I could tell from another room it was done. Perhaps keyed into the Apple family of "alert" sounds, kind of like when mail arrives and alert signal chimes. Or as Tomas reminds me, the chime at the end of an After Effects render. (Not sure I posted in right place, but User Pack listing by Ian would not let me "reply")
-
Maybe this feature exists and I don't know it... but many times I set up a render and leave the room. It would be cool if when the render finishes stitching, it would make an audio signal, so I could tell from another room it was done. Perhaps keyed into the Apple family of "alert" sounds, kind of like when mail arrives and alert signal chimes. Richard
-
Great, thanks... got it running again... ! Richard
-
I am away from my usual setup, but did bring my MacPro with me and need to set up a small render farm of four cameras. I put them on the third HD of this machine. Problem is I can't quite remember how I got the initial IP addresses into each Slave. It's easy when I'm at home, because the Slaves are all on Mac Nehalem and I just plug in the FW800 and the Slaves open w the correct IP. Is Ian's video tutorial still posted somewhere? Where do I get the IP? The main HD is showing me a 127. type address, but shouldn't it be 169.254. something? Please help, a client wants a change and gotta get to it... Thanks!! Richard
-
Thanks Everybody!! These thoughts and ideas are very helpful, and sort of confirmed some of my suspicions.... Cheers, Richard
-
I'd like to spend a little time this summer organizing backup HDs which contain resources like EIAS models, materials, as well as .IMG footage and stuff that then might be used in AE or FCP. So far, I've never had a Lacie HD that didn't have FW connection. But I see that they do have some models that use only USB 2.0. ?? Is this adviseable to rely on USB 2.0 for big and fast transfers, or do you think a bu HD should also have FW? My Mac Pros are connected by FW800 for render farming. Thanks! Richard
-
http://www.eias3d.com/forums/images/smilies/huh.gif Hey everybody! I am taking a simple ball given it 100% reflectance and reflectance mode set to "normal". Then I go to World > Raytrace and add a Dosch .hdr LP. Why do I get this? I figured out. I had it mapped as "spherical" rather than as "lightprobe". Also, I turned my sun completely off and got perfect reflectance. Rich

-
Hi Dave, Thanks for the reply! If I load a Light Probe into the Raytrace tab of "World" I can use .img or .hdr... correct? These settings would be unrelated to the GI box "glossy" settings, which are an actual response to the sky map that's loaded. Is that right? Do I need to go into the "reflectivity tab" of each material and set it to "normal" and "use global reflection" or "use environmentor is this irrelevant if I am not using global reflection... ? Also, I have enclosed render using .hdr. The scale of the reflections is really huge and blurry and not realistic... I must be doing something wrong. The .hdr is from a Dosch disc. Thanks! Richard
-
Hi Tomas! Thank you for the good words. And thank you for the idea of the low poly Light Objects emitting photons rather than have them be lights. Yes, will study. Dave (Archetype) got me going last fall, and now feel like I'm back on track and the various controls are starting to make more sense to me. Cheers! Richard
-
Let's say I have a glass building that's reflecting the environment. Which is more appropriate, the World "Global Reflection" or the World "Raytrace". They both seem to work. Should these be HDR or just IMG? Thanks! Richard
-
Another thing I did. In the first file, it was three walls. I then added a fourth wall to make it a contained room and give the photons something to bounce off of. How relevant is that? I don't know, I'm on a steep learning curve. Thanks! Richard
-
Hi all, Here is where I posted some more findings: http://www.chenarch.com/eias_bath_photons.jpg It seems to be going well now... The first set-up may have had some lousy geometry (the tub) which I fixed, then started the scene over. [Prior to that I was setting up two area lights w photons and it would render forever and look terrible]. The scene is 24k polygons. First I got the sun and one area light working properly with quad dropoff at right distance (which Dave told me last fall). Establishing this first is important. Then did photons from the window area light, then added an area light (to simulate a door behind camera) and gave that photons, too. The sconce lights and sun do not have photons. It worked pretty well after that, keeping Direct Lookup Radius at a reasonable number. I finally realized this number is like counting bricks. You can count bricks within a ten foot radius, but if you tell the camera to count bricks within a 150 foot radius it will bog down. At least that's the way I've been thinking of it. Renderama was fine with it. A few quirks, but it always got back on track. With ten slave cameras on a Nehalem MP, this scene would render in about a minute or so at resolution 640. I put a couple of basic fast textures on it. I'd still like to get shadows more pronounced from the sconces, but also trying to keep the sconce light to not get any brighter than this. I'll post the other test with the room and the egg... Thanks all!! Richard Yes forgot to say that I used GI w the baked photon maps but ONLY as Reverse Illumination with One Bounce (no Sky Light). I also had a World Global Reflection using Debevec's "Kitchen Probe". Richard
-
Yes, Ian. I will post the "test" file that seems to be working and is fun to play with and will also post the difficult file of the bathroom that makes my cameras "not responding". Try to do that later today. Richard
-
I got a lot of help last fall with photons from Dave (Archetype). I had a sample project worked up of an empty room with an egg in the middle of it. There was an area light at some windows (photons), a panel light in a room (photons), a sun for shadows (no photons). I've gone back and studied that project. I can make tweaks and see changes and it seems to render quickly. Now I am trying to do a bathroom with one area light at window (trying to bake photons). Total scene polygon count is 224,000. It is taking FOREVER. I have it going to a Nehalem machine running 10 cameras. Just trying to make a 320 X 300 test render. I'm not quite sure I have it right. Is there any more written material on photons besides the Animator Manual? I will look for tutorials, too. Thanks, Richard
-
That was great, Randall! The style of the scenes was perfect. I loved the fake Orson Welles type voice-over. Perfect direction. Just the right amount of irising and scuzz in camera to create the sense of an old movie... super job. Is the comp over? How did you do?
-
Hey Ian, Is the Pacifica tutorial available now somewhere? Thanks! Richard